
Ceiling Fan
- Elliot Pavlovich
- Nov 19, 2020
- 6 min read
Updated: Jan 2, 2022
Installing the ceiling fan. And lights.

People of interest:
Brian - hometown friend and mechanical engineer
Cost:
Ventilation Fan - $129.99
DC coax - $13.50
Butyl Tape - $5.42
Bolts - $7.96
Washers - $2.07
Locknuts - $4.80
Loctite - $7.99 (bought it, but forgot to use it)
Silicone - $6.99
Lights - $13.99
USB extender - $7.69
Velcro - $7.60
Materials I already had:
Jigsaw
Ladder
Extension Cord
Soldering Iron
Wire strippers (borrowed from Brian)
Solder and heat shrink (borrowed from Brian)
Electrical tape
Drill
Socket wrench
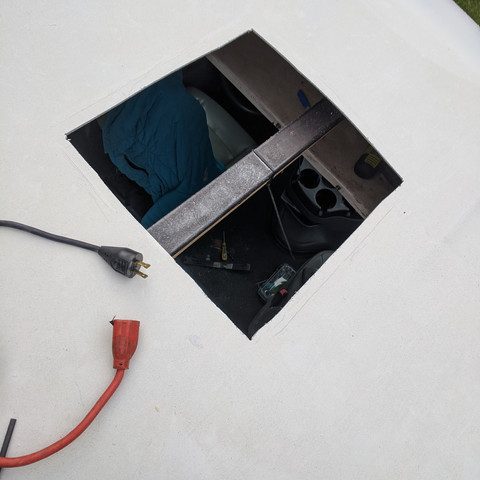
Cutting the Hole
I will admit, this was the scariest part. The point of no return. Once I made the cut in the ceiling I couldn't go back. Everything else wasn't really permanent. To make sure I actually completed the job, I did it 48 hours before it was going to rain. Also, then it would test if it were leak proof.
After reading the directions, I drew and cut a 14 x14 inch square hole, as centered in the van left to right as possible. The bars were in the way though. I thought the roof was going to be aluminum, but it was carbon fiber, so cutting it was a lot easier (I was able to use a jigsaw instead of tinsnips).


Screwing in the fan (and switching to bolts)
I stuck butyl tape to the under side of the fan, then peeled off the backing for the other side of the tape and popped the fan in. The tape was there to help prevent leakage, particularly since the roof of the van has a slight curve and the fan was not able to sit flush with it.
The treads on the screws that came with the fan were too close together and didn't catch properly, so I used old wood screws we had. Later, after some nudging from my dad, I decided it would be better to bolt the fan to the ceiling instead. So I went out and bought bolts and extra nylon locking nuts, just to make sure they wouldn't rattle loose from the vibration during driving.
However, I couldn't bolt it by myself, so I had Brian come and help. He held the nuts from underneath while I was on the roof. Kinda feel bad, cuz I can barely stand in my van and he's a half foot taller than me.
After the fan was installed, I caulked the edge and the tops of the bolts with silicone for even more protection.
Wiring it up
I probably should have tested the fan before I installed it, but better late than never. I didn't have the right connection. As I said in my MORE POWA! post, I bought I prebuilt battery that did not have positive and negative terminals, so I tested it with a spare car battery we had.
At first it wasn't working and I panicked. Apparently it has a safety mechanism that doesn't allow the fan to work if the lid was closed. Brian figured that one out for me.
Postal Service Saga
I ordered dc barrel plugs from amazon, but they can only be bought in bulk. So I got 10 of them. I was so excited to connect the fan up with that wiring. I was really starting to feel like an enginmaneer. What I did not realize though is that barrel plugs come in different sizes. I mean I did realize that, but I idiotically assumed that the personal use power bank would have the "standard" size, especially because it was not stated otherwise.
Instead of using a 5.5mm jack (standard), it used a 6.5x1.4 mm one (not on amazon or at Home Depot).
The day I realized I had the wrong size plugs, I went online and within 2 hours (and many sites later) bought a correct size one. Relatively cheap and free shipping. Another 3 hours, and I got an email from the company saying they don't have the part and will be refunding my money. Back to searching. The next site I found (I was going to use them originally) had the parts for $3.50 plus $5 shipping (give or take). When I went to order it the first time, they said they would not ship anything less than $5. In the end I bought 2. They had 6 extra feet of wiring, so I considered it to be worth it. I was able to return the 14 gauge wiring I had bought from Home Depot ($12.26 total). It all worked out in the end.
I waited... and waited... and waited... checking the USPS tracking site religiously. 3 weeks and my package still had not come. This also delayed the rest of my work, because I was not able to finish the roof I had the wiring. Eventually I went to the post office and was like "Yo, my package has not moved from this town in two weeks." They said they would call and I would get the my package in the next few days. Three days later, it still had not been scanned out for delivery, so I went back to the post office. Since it had been more than 10 days since it had last been scanned, it was now considered lost. I would have to call the company I bought the part from and have them ship me a new one.
This turned into phone tag. I called the company, was put on hold, said a few words to an actual person and was put on hold again. 45 minutes later, I am talking to the "right" person. He tells me that I have to go back to the post office. I told him the post office told me to call them. UGH!!
He did email me back later apologizing for the confusing and said they would be shipping me a new one. 4 days later I got it in the mail.
**Disclosure: I am not suggesting this and in no way condone it or should be liable for those who may or may not do this.** When I went on Amazon to return the $8 worth of barrel jacks, they gave me back the money and did not even have me ship back the product. I guess it was more expensive to go through the effort of paying the shipping and restocking the shelf with a product that probably is not bought that often, than it was to just eat the $8 and give me the refund. A criminal mastermind (again, not condoning this), could easily buy cheap products "return" them, then turn around and resell them and turn a profit.
Wiring it up (for real)
After all that effort to actually get the plugs, connecting it wasn't too bad. I used old scrap wire that I scavenged from left over wiring in the van. I connected those wires to the short wires from the fan, then attached the barrel plug wires to that. Easy peasy. I slid the heat shrink over the soldered connection and used a hair dryer (I don't own a heat gun) to shrink it.
For electronics, black is ground, but for electrical work, white is. I wired it backwards the first time.
Lights
The lights were a different story. I bought these fancy LED strips that are meant to go under the seats in a car to make cool colors at your feet. (Photo from Amazon)

It was 4 strips each with 12 LEDs that were connected to a center hub. I spread out the strips to the side of my van. Since I did not know the exact location for the lights, I ziptied them to the roll cage bars. I never ended up removing the tape from the back of the lights, they are still just held on with zipties.
Also connected to the hub was an IR sensor for the remote control. The hub was as thick as the ceiling insulation, so I cut a small hole in the insulation and replaced it with the hub. Leading out of the hub was the USB power cord. The cord was too short to reach the spot where I had planned to have the jackery. I bought a 20 ft USB extender. That was long enough. (The next size shorter was 6 ft and that was possibly just too short)
The only way to turn the lights on/off was by using the small remote control. I knew I was going to loose it. I managed to nearly loose it multiple times before I was even done installing the lights. I decided to make a "light switch area" near my bed. I velcroed the remote to the wall. That way it would have a specific location.
Dangling Wires
All wires will be hidden behind the ceiling. Therefore I could not do the ceiling until the plug for the fan came in and I could do all the soldering for it. I was able to panel the top part of my ceiling, but the side with the wires, I had to wait, which is when the whole postal saga ensued, delaying that section of my project.


Comments